How To Use The Critical Path Method For Construction Projects
Why Use The Critical Path Method?
In most industries, scheduling is needed to keep things in order and this is especially true when it comes to construction. Without a proper plan, even the simplest of projects can fail (and no project manager wants failure on their resumé). Luckily, there’s a well-established system in place that many successful project managers are using to ensure that their construction projects run smoothly.
This system is called The Critical Path Method (CPM), although some refer to it as Critical Path Analysis (CPA) or Critical Path Scheduling.
Whether you refer to the system as a method or an analysis, it is essentially a popular time management tool due to its simplicity and effectiveness.
CPM can be used alongside The Program Evaluation & Review Technique (PERT). The two together resemble a type of to-do list where CPM maps out the project duration and PERT acts as the network diagram. Each task is given a start and finish date as well as a milestone date, which is tracked along the critical path until the project is completed.
The Critical Path Method generates a visual representation of a project and estimates the amount of time and resources needed to finish each task. It also identifies important actions that must be attended to in order for the project to be completed on time.
In a nutshell, it’s a process used to schedule the set of activities within a project and effectively monitor it.
How CPM Applies To Construction
CPM is a frequently used and popular tool in construction and it is the go-to technique used by managers to schedule projects. It is favored because of its ability to calculate the time needed to complete tasks as well as organize start and end times for specific activities.
Splitting a project into work tasks, presenting them on a flow chart, calculating the length of each task and overall project duration are all part of the CPM approach to project scheduling and are necessary for project execution. There’s a reason construction literature and veteran managers reference The Critical Path Method as the best solution to organizing projects and we can see why.
CPM has been used throughout the years with graph illustrations, evolving to computer programs and software. Now CPM software is readily available and can efficiently structure projects through dedicated algorithms making it easier for construction companies to adopt.
A graph created by CPM creates a visual representation of all the different jobs and their relationships to one another. This can manifest through diagrams of coded circles and arrows that represent key aspects of the project such as jobs and dates - this intricate web is what many call a project network.
As you can imagine, The Critical Path Method is quite literally a critical tool to use within construction.
Let's Break It Down
Key pieces of information are needed for project managers and superintendents to put together a CPM project model. Let’s take a look at what that involves:
With these factors in mind, managers can effectively use The Critical Path Method to plan their projects. All it takes to use the system is a willingness to get organized and zoom out to see the big picture before zooming in to get started. Keep in mind that changes happen along the way, but it’s important to have a solid foundation before beginning.
Don't Be Intimidated
Even though The Critical Path Method may appear scary at first glance, it's actually quite straightforward - and a terrific method to get projects to run smoothly.
It is true that some small construction projects can be planned on the fly, but doing so for bigger projects would likely lead to disaster as there are too many moving pieces to keep track of. CPM is your friend here.
Benefits of Adopting the Critical Path Method
It’s Approachable:
One of the greatest things about the Critical Path Method is that it is approachable for all team members. Due to the fact that the whole project is mapped out in an understandable way, everybody involved in the project can see how each task affects the overall duration of the project. If one task needs to be delayed (for whatever reason), everyone involved in the project will know how that will affect the entire process. In addition, because this system is so transparent, there is little grey area… no team members are left wondering why a deadline hasn’t been met or who is responsible for what. For this reason, this benefit extends beyond project management as it also increases employee and team satisfaction.
It’s Bite-Sized:
Breaking down a complicated process into bite-sized tasks is one of the simplest and most effective ways to take on any task. When it comes to construction, projects can have all kinds of large moving pieces that need to be broken down and managed. By mapping out small tasks, CPM removes the sense of overwhelm in team members because small tasks seem more achievable than large ones. Breaking things down with CPM makes any potential delays (whether critical or not) easily visible while ensuring management and oversight are accessible.
It’s Fluid:
Due to the ever-changing nature of construction projects, it’s important to be able to create a plan that can change if necessary. So many different setbacks can happen so it’s important to be flexible and change with the current set of circumstances. The Critical Path Method makes this simple to do as it is designed in a way that allows change. In order for it to be changed, a project manager will need to continuously update and monitor the process to ensure overall effectiveness.
Six Action Steps To CPM
Now let’s get down to action, here are some ways to put the theory into practice:
1. Identify the Activities
Begin by making a list of project activities, which you can get from the work breakdown structure or the project scope and specifics. Following that, the sequence and duration will be added. Activities are labeled with a name, a coding system, an accounting string, or another identifier, and must have a duration or, in the case of milestones, a goal date. You will want to do this first so you are aware of everything that needs to get done.
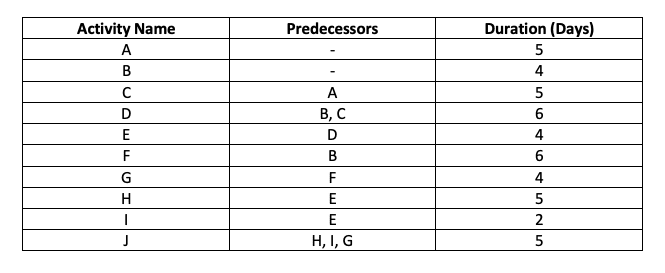
Here we have some example activities as well as their expected duration
2. Determine the Activities’ Sequence
In order for the project to run smoothly, it is vital that you determine the sequence of the activities that need to be completed. To create and connect the list of activities organized in the previous phase, you'll need a complete and thorough comprehension of the activity sequence. To illustrate the right connections in the schedule, the project or construction manager must first comprehend the linked or related operations. Contractors can often fail to recognize these connections, resulting in project delays and other issues.
3. Create the Network
This is the step where the spider’s web is really formed. The CPM involves summarising the described activities while also demonstrating their interdependence and all key task sequences must be coordinated and planned logically. The primary planning unit should be based on using calendar days and working days should be avoided in a CPM schedule since they are more prone to cause confusion and errors.
4. Estimate Activity Completion Time
Now is an important time for the project manager to use their previous experience to determine the time span for each activity. Once you know the time frame for each activity, you will gain a clear picture of the time span of the entire project.
5. Identify the Critical Path
So, this is where the real meat and potatoes kicks in. Let's dive into it all.
The Critical Path Method as an essential part of the planning process. The activities that are placed within this path are unable to be postponed without it affecting the remainder of the project.
In order to identify the path of an activity, let's identify a few key terms below:
Early Start (ES) → The earliest time given to begin an activity.
Early Finish (EF) → The earliest time to finish an activity.
Late Start (LS) → The latest time to start an activity without it causing the entire project to be delayed.
Late Finish (LF) → The latest time to finish an activity (and essentially when the task MUST be completed) without it causing the entire project to be delayed.
Now let’s break it down into a couple of steps to see how you can use these parameters to find the Critical Path.
Step 1 – Forward Pass
We use this technique to ascertain the Early Finish Time (EF) of each activity and to assess, overall, the project duration.
To calculate the EF, we use this formula:
Early Finish (EF) = Early Start (ES) + Activity Duration
In the diagram below we can see the correlation between EF and ES. The first activities, A and B, start at 0. The Early Start of the subsequent activities, C and F, correspond to the Early Finish of A and B.
So, to clarify, the ES of Activity C will be 5, and the the ES of activity F will be 4.
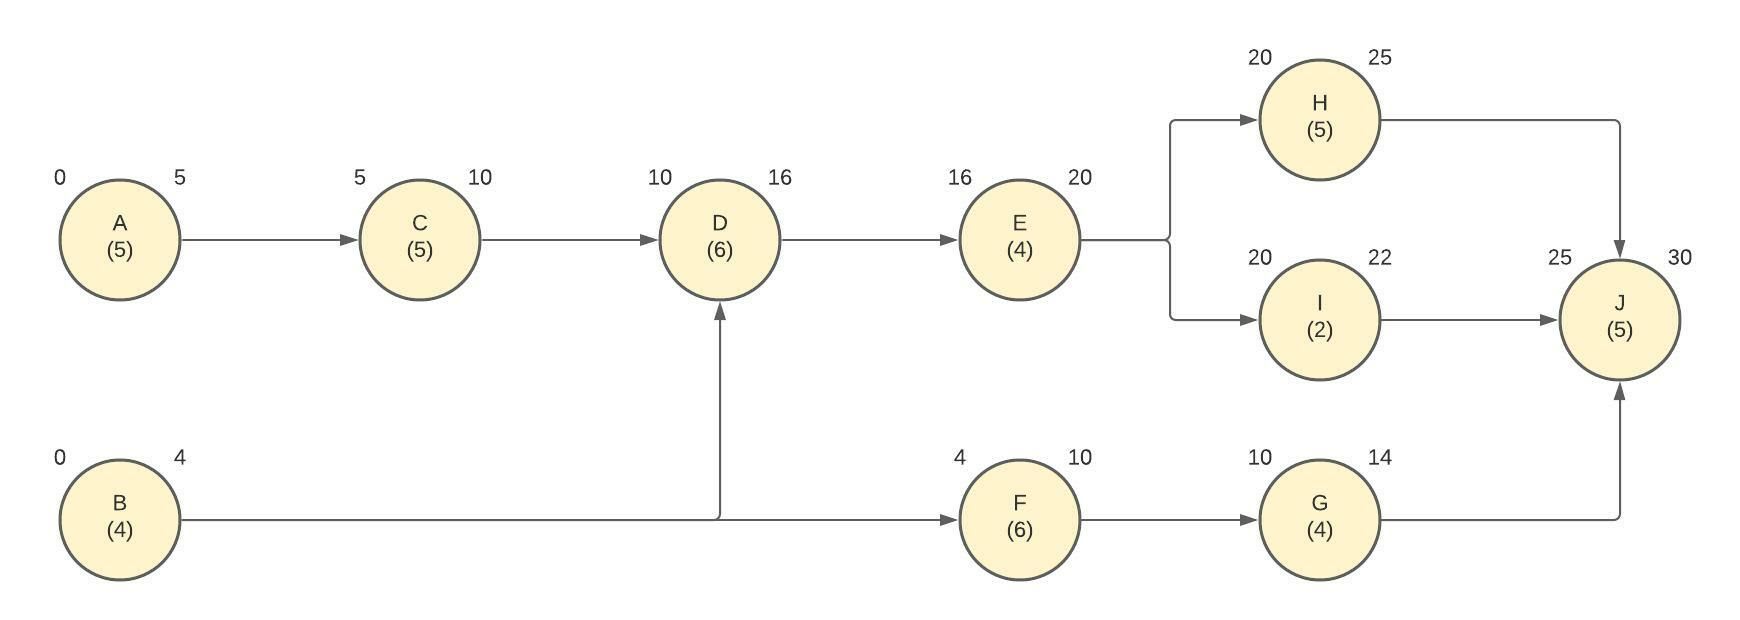
The Early Start of Activity C will be 5 days, and the ES of activity F will be 4 days
An important fact to keep in mind is that when an activity depends on multiple predecessors, such as Activity D with predecessors C and B, you must choose the predecessor with the highest Early Finish Time.
In this case, that would be Activity D at 10. Activity J is the same; it depends on three predecessors, H, I and G. So, the correct EF time to choose would be that of H, 25.
Step 2 – Backward Pass
We use this technique to determine the Late Start (LS) of each activity.
To calculate the LS, we use this formula:
Late Start (LS) = Late Finish (LF) – Activity Duration
In the diagram below, we need to look from right to left. You can see that the initial Late Finish is in fact the total project duration (30) whereas the Late Finish of all other activities on the diagram correspond to the Late Start of each activity’s predecessor.
When applying the backward pass, if an activity has multiple predecessors, the LF will be the lowest LS of each previous activity. So, for example activity E depends on activities H and I with an LS of 20 and 23 respectively. The LF of Activity E will therefore be 20.
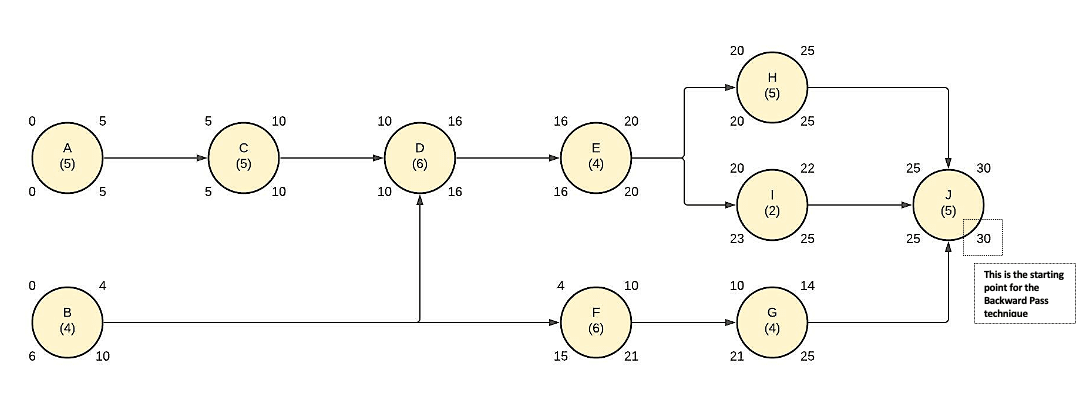
The Backward Pass process begins at the Late Finish of activity J
Step 3 – Float Calculation
Once we have assessed the above parameters, we can use this technique to find Total Float and Free Float, which are fundamental in determining the critical path of our planning process.
Total Float
Total Float represents the amount of time that an individual activity may be delayed without delaying the entire project.
To calculate the Total Float, we can use one of two formulas:
Total Float (TF) = Late Finish (LF) – Early Finish (EF)
Total Float (TF) = Late Finish (LF) – Early Finish (EF)
The result for each of the above formulas should be equal. If they are not you will need to reassess Steps 1 and 2.
Free Float
Free Float represents the amount of time an activity can be delayed before any subsequent activity will be delayed. To calculate the Free Float, we use this formula:
Free Float (FF) = the lowest Early Start (ES) of the predecessor – the activity EF.
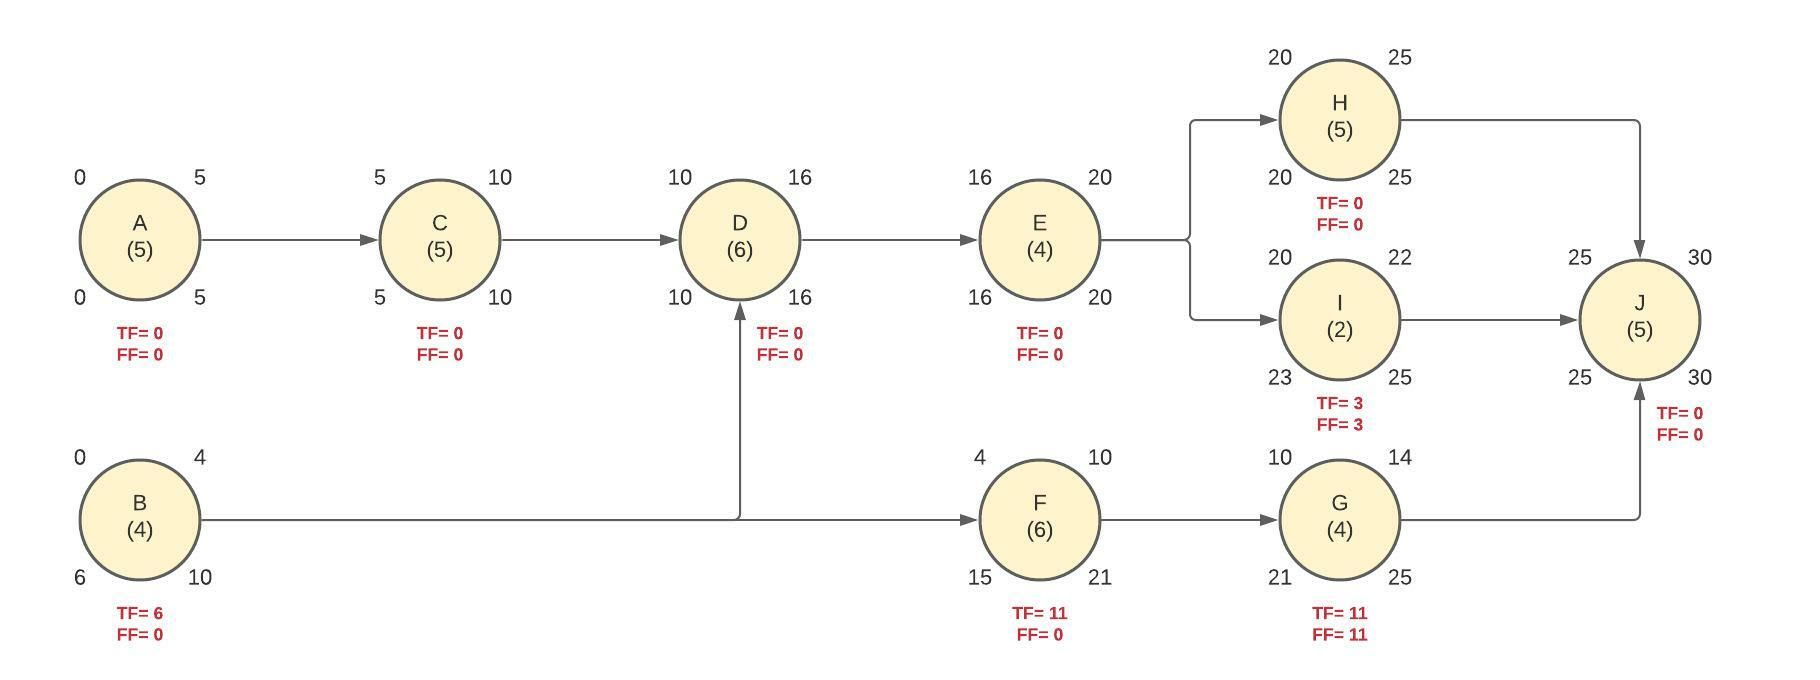
Here we can see the Total Float, and Free Float for each activity marked in red
Step 4 – Finding the Critical Path
The critical path of a project refers the series of activities that cannot be delayed if one wants to complete the project on time. The total float of all critical path activities must equal zero.
In the diagram below, activities F, G, and I all have total floats above zero and can therefore not be included in the critical path.
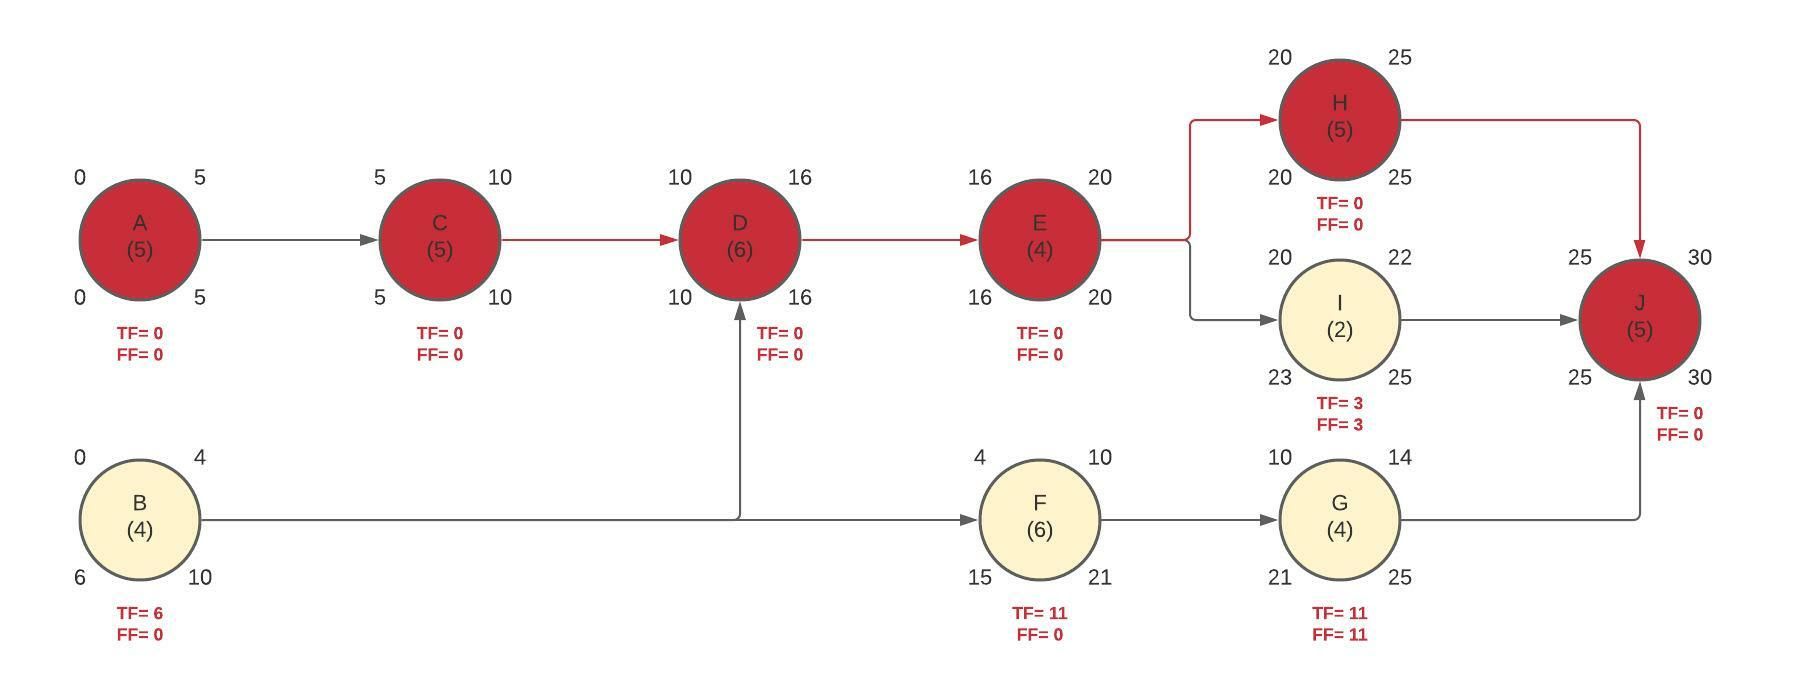
Here we can see the Critical Path marked in red
6. Update the CPM Diagram as Needed
You can adjust the critical path as the project progresses. When all actions that have previously been completed are entered, it may be possible to create a new critical path. A different path could be conceivable, and alternative solutions may either speed up the project or keep it on track. On the odd occasion, you may find it necessary to incorporate changes and additional tasks that were not originally part of the critical path.
The Takeaway
Ultimately, the critical path method is a brilliant system that is used by many project managers in the construction industry to plan their projects. It safeguards against setbacks while also leaving room for necessary changes and additional updates. While the method can seem daunting, it can be broken down into a few basic principles that anybody can follow. At its core, it is simply an effective and helpful time management tool necessary for a construction business that wants to thrive.
